Complete guideCrawl Spaces
Crawl Space Inspection: What Inspectors Check, What They Find and What to Do Next
A crawl space inspection covers eight zones under your floor. Here is what a home inspector must check, when they can skip it, what the findings mean and who to call.
A crawl space inspection is a close look at the space under a raised floor to check the foundation, the floor framing, moisture, insulation, plumbing, wiring and pests. It is usually part of a home inspection when a house is bought or sold, but homeowners also order one when floors sag, rooms smell musty or a contractor recommends a repair. This guide is part of our crawl space guides, which explain each problem from cause to fix.
If your inspection report has a crawl space section full of findings, or the inspector wrote that they could not get in, you are not alone, and most of what is under the house can be sorted into a short list of next steps. In this guide I will explain what a crawl space inspection covers, what home inspectors must and need not do, who else inspects crawl spaces, how to check your own safely, and what to do with each common finding.
Short answer
A crawl space inspection checks the access, foundation walls, piers and beams, joists and sill plates, ground and vapor barrier, vents and insulation, plumbing, ducts and wiring, and signs of pests. Under the ASHI Standard of Practice, a home inspector must inspect the foundation and framing and describe how the crawl space was inspected, but is not required to enter one with less than 24 inches of clearance or one that is unsafe. Structural findings go to an engineer; moisture and pest findings go to specialists.
Routine
Minor upkeep items
A torn liner, fallen insulation or debris. Fix within the season.
Repair soon
Moisture and leaks
High humidity, damp wood, surface mold or plumbing leaks. Fix within weeks.
Specialist now
Structure or termites
Rotted framing, sinking piers, cracked walls or active termites. Call an engineer or pest company.
What Does a Crawl Space Inspection Include?
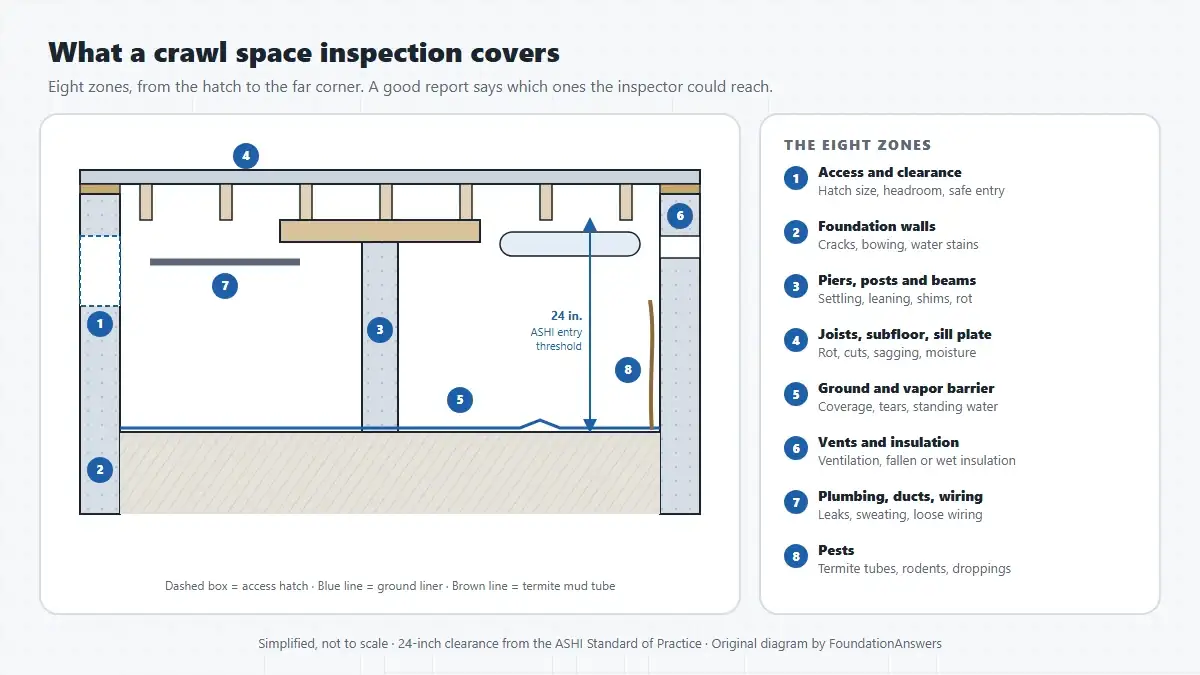
A thorough crawl space inspection works through the space zone by zone. Below I am sharing the eight zones and what the inspector looks for in each.
- Access and clearance: The size of the hatch, the headroom inside, and hazards at the entrance such as standing water, wiring or sharp objects.
- Foundation walls: Cracks, bowing, water stains, mineral deposits and gaps at the sill.
- Piers, posts and beams: Piers that lean, crack or have sunk; loose or crushed shims; beams that sag or rot.
- Joists, subfloor and sill plate: Rot, termite damage, sagging and joists cut for plumbing. Many inspectors probe wood and take moisture readings here.
- Ground and vapor barrier: Whether a liner covers all the soil, whether it is torn or loose, and whether water pools on it.
- Vents and insulation: Blocked or missing vents, and insulation that has fallen, sagged or got wet.
- Plumbing, ducts and wiring: Dripping pipes, sweating or disconnected ducts, and loose or damaged wiring.
- Pests: Termite mud tubes on walls and piers, rodent droppings and nests, and damage from wood-boring insects.
The building code sets two of the reference points inspectors use. The International Residential Code requires an access opening of at least 18 by 24 inches through the floor (Section R408.4), and it requires wood within 18 inches of exposed soil for joists, or 12 inches for beams, to be pressure-treated or naturally durable (Section R317.1).
What Home Inspectors Must and Need Not Do
Most US home inspectors follow a published standard of practice, and the one from the American Society of Home Inspectors (ASHI) spells out the crawl space duties clearly. Below I am explaining what it requires, in a table.
| Requirement | What it means for you | ASHI section |
|---|---|---|
| Inspect structural components, including the foundation and framing | The crawl space framing and foundation are part of a standard inspection | 3.1.A.1 |
| Describe the methods used to inspect under-floor crawlspaces | The report should say whether the inspector went in, looked from the hatch or used a camera | 3.1.B.1.a |
| Inspect insulation and vapor retarders in unfinished spaces, and foundation ventilation | Liner, insulation and vents are covered | 11.1.A |
| Not required to enter crawlspaces with less than 24 inches of vertical clearance | Low crawl spaces are often viewed only from the hatch | 3.2.C |
| Not required to enter crawlspaces that are not readily accessible or likely dangerous | Blocked, flooded or hazardous spaces may be skipped | 13.2.D |
| Not required to disturb insulation | Framing hidden behind insulation may go unseen | 11.2 |
As the table shows, a home inspection covers the crawl space, but only as far as the inspector can safely reach and see. Always read the "method used" line in the report: "viewed from access" means most of the space was not inspected up close.
Who Inspects a Crawl Space?
Four kinds of professionals inspect crawl spaces, and each one looks for different things. Below I am explaining their roles and typical costs in a table, using Fixr's cost data (January 2025) and This Old House's engineer fee (October 2026).
| Professional | What they cover | Independent? | Typical cost |
|---|---|---|---|
| Home inspector | Visible condition of all eight zones, as part of the whole house | Yes | About $400 for the whole home ($300–$500) |
| Pest control inspector | Termites and other wood-destroying insects | Usually also sells treatment | Often bundled with treatment quotes |
| Crawl space or foundation contractor | Moisture, liners, drainage, supports | No, sells repairs | Often free |
| Structural engineer | Cause and repair design for framing, piers and walls | Yes | $500–$1,000 for a report |
| Radon or mold testing | Air testing for radon; mold assessment | Depends on the company | Radon $125–$400; mold $450–$800 |
As the table shows, the independent opinions cost money and the free ones come from companies that sell the fix. For anything structural, pay for an engineer before you pay for a repair.
How to Inspect Your Own Crawl Space Safely
You can do a useful once-a-year check yourself if the space is dry and has room to move. Below I am sharing the steps.
- Check from the hatch first: Look for standing water, sagging wires, animals or droppings. If you see any, stay out and call a professional.
- Gear up: Wear disposable coveralls, gloves, a respirator, knee pads and a headlamp. Tell someone you are going in, and keep your phone with you.
- Bring three tools: A bright flashlight, a screwdriver to probe wood, and a pin moisture meter. A cheap hygrometer left inside for two weeks adds a humidity reading.
- Work in a pattern: Go along each wall first, then across the middle, so you see every pier and every bay of joists.
- Probe and measure: Press the screwdriver into sill plates and joists near the walls; sound wood resists. Take moisture readings in several places.
- Photograph everything: Take wide shots and close-ups of anything unusual, with something for scale.
- Do not squeeze: If you have to force your way past a pipe or duct, turn back. A stuck person in a crawl space is hard to rescue.

If your readings show damp wood or high humidity, our guide to finding and fixing moisture in a crawl space explains which source you have and the fixes in order of cost.
Common Crawl Space Inspection Findings and What They Mean
Most crawl space findings fall into three groups by urgency. Sorting them first tells you who to call and how fast.
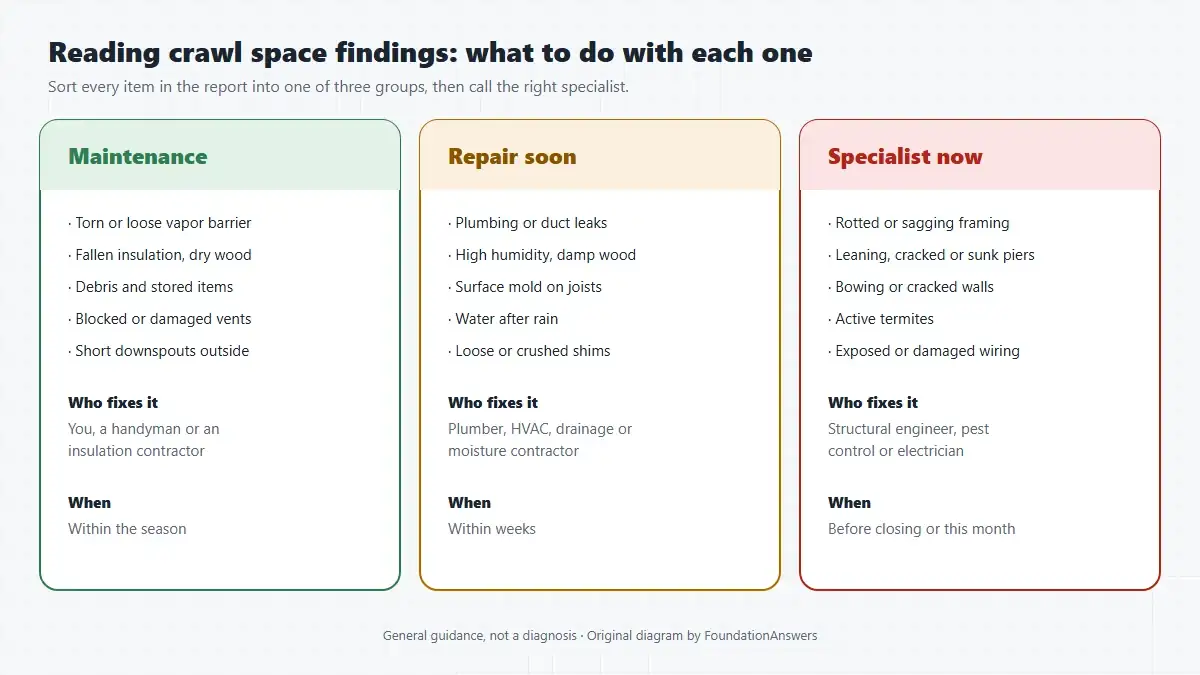
Below I am sharing what the most common findings usually mean.
- "Elevated moisture" or "high humidity": The wood or air reads damp. Find the source before you accept a dehumidifier or encapsulation quote.
- "Microbial growth" or "mold-like staining": Usually surface mold on joists. Our crawl space mold guide explains EPA cleanup sizes and costs.
- "Missing or damaged vapor barrier": Bare soil adds moisture all year. A sealed liner is one of the cheapest fixes.
- "Settled or leaning piers" or "shims": Supports have moved. If the floor above slopes, our pier and beam foundation guide covers re-shimming and new piers.
- "Wood rot" or "damaged sill plate": Probe the extent. Rot that goes deeper than the surface needs framing repair and a fix for the moisture.
- "Evidence of wood-destroying insects": Mud tubes or damage. Get a licensed pest inspection to confirm whether the activity is current.
- "Not fully accessible" or "viewed from access": Much of the space was not inspected. Arrange a return visit after access is cleared.
So, What Should You Do With the Report?
The next step depends on your situation. Below I am sharing the usual plan for each.
- Buying a house: get quotes for every "repair soon" and "specialist" item before your inspection deadline, and use them to negotiate price or credits.
- Selling a house: fix the cheap maintenance items, document them, and get an engineer's letter for any structural finding so buyers see a clear answer.
- Living in the house: fix water sources first, then framing, then sealing, and recheck the space each year.
Example: Suppose a buyer's report lists a torn liner, damp joists at 22% moisture near one wall, and two piers with crushed shims. The liner and a gutter extension are maintenance items. The damp joists need the gutter fixed and a recheck. The piers need a contractor to re-shim them, and an engineer only if the floor above still slopes afterward. The buyer asks for quotes on all three and negotiates a credit.
Common Mistakes to Avoid With a Crawl Space Inspection
- Not reading the "method used" line: A crawl space viewed from the hatch has not been inspected up close.
- Letting the seller block access: Stored items, debris or a sealed hatch hide problems. Ask for clear access before the inspection.
- Treating a free inspection as independent: Free inspections usually come from companies that sell the repair.
- Skipping the termite inspection: A general inspector notes visible signs; a pest inspector confirms them.
- Buying the biggest system first: Fix water and leaks before you pay for full encapsulation.
- Crawling in when it is unsafe: Standing water near wiring, animals or tight squeezes are reasons to stay out.
Conclusion
A crawl space inspection checks eight zones under your floor, from the hatch to the pests. Home inspectors following the ASHI standard must inspect the foundation and framing and say how they did it, but they can skip low, blocked or unsafe spaces, so read the method line. Sort the findings into maintenance, repairs and specialist items, fix water first, and get an independent engineer for anything structural. For more help, browse our independent guides to inspecting and fixing crawl spaces.
Frequently Asked Questions
-
How much does a crawl space inspection cost?
A crawl space is usually inspected as part of a general home inspection, which Fixr's data puts at about $400 on average ($300 to $500), with houses that have crawl spaces sometimes costing more. Add-ons cost extra: radon testing runs $125 to $400 and a mold inspection $450 to $800. A structural engineer's report on the foundation typically costs $500 to $1,000.
-
How often should a crawl space be inspected?
Look inside at least once a year, ideally at the end of a humid summer, and again after any major storm, flood or plumbing leak. Add a hygrometer so you can check humidity without going in. Have a professional inspection when you buy or sell, when you see new floor problems above, or before you pay for encapsulation or major repairs.
-
Should I buy a house if the inspector couldn't get into the crawl space?
Not without more information. An inspector who cannot enter only reports what is visible from the hatch, so the condition of most of the framing is unknown. Ask the seller to clear the access or remove debris, then pay for a return visit, or hire a specialist who can inspect tight spaces. Use what they find to negotiate.
-
Are free crawl space inspections worth it?
They can be a useful second look, but treat them as a sales visit. Companies that offer free inspections usually sell encapsulation, drainage or foundation repairs, so the report may lean toward their products. Ask for photos and moisture readings, and get an independent inspector or engineer for anything structural.
-
Is mold in the crawl space a deal breaker?
Usually not. Surface mold on joists is a common finding and is fixable once the moisture source is solved, often for a few hundred to a few thousand dollars. It becomes a bigger issue if the wood is soft or rotted, the mold covers large areas, or water stands on the ground. Get a quote for cleanup plus the moisture fix before you decide.
-
Do I need a separate termite inspection?
Often yes. A general home inspector may note signs of pests, but a wood-destroying insect inspection by a licensed pest control company is a separate service, and many lenders and buyers request one. In termite-prone areas, ask the pest inspector to check the crawl space walls, piers and sill plates closely.
Sources and Standards
- American Society of Home Inspectors, ASHI Standard of Practice for Home Inspections, Sections 3, 11 and 13.
- R. Bunzel, ASHI Reporter, Crawl space inspections: practical information and tips, February 2018.
- International Code Council, 2021 International Residential Code, Sections R408.4 (access) and R317.1 (wood clearance to soil).
- Fixr, Home inspection cost, updated January 2025.
- This Old House, Foundation repair cost (structural engineer fees), updated October 2026.
- US EPA, A brief guide to mold, moisture and your home, updated February 2026.
This guide is general information and does not replace an on-site inspection by a qualified professional. Read our disclaimer.